Spinning up FastAPI
Please Log In for full access to the web site.
Note that this link will take you to an external site (https://shimmer.mit.edu) to authenticate, and then you will be redirected back to this page.
Error on line 2 of Python tag (line 3 of source):
    student_servername =  BASE_SERVER+"/"+STUDENT_SERVERS[cs_username]['endpoint']

KeyError: 'None'
In 6.900, pretty much all of the projects we'll be working on will need some sort of distributed system where computation is both "on the edge" in embedded systems as well as centralized to some degree "in the cloud" aka on a server, with us using various network protocols to link everything together. The embedded side will get worked on lab 1, but we also need to focus on the server side. For this we'll use Python and in particular a web framework written in Python called FastAPI1. We chose FastAPI since it is new and fast and written in Python since you should all have some working knowledge of Python. It is also very well-documented and actively developed so you can lean on the internet and documentation to help develop things in your experimentation.
We'll set up a FastAPI application that can be run on your local laptop. This is great for development since you can use the tools you know and love (pick your poison, VScode, IDLE, I don't care) and since it is all local, the debug loop will be much faster. Eventually this framework can be migrated onto an actual server for long-term deployment with your projects as well.
Get Started
We're going to assume you have Python on your computer. What we're doing is pretty flexible to your development environment/framework, so we'll assume that you can navigate Python on your system. We would strongly encourage you to make a virtual Python environment rather than just install things on your system Python, which is a separate "clone" of your system Python. Why make a virtual environment and not just use the system Python? Well the main reason is just to keep things isolated. If we mess up the Python with an installation, we'd rather that be the standalone python rather than the one that much of the system might be depending on. It also allows us to run multiple apps on different Python environments and potentially not run into any big issues with conflicting libraries.
Making a virtual environment can be done with a command like the following (in a terminal/shell), though note you may just need to use python rather than python3. Here I'm making a virtual environment called "efi_venv" short for "engineering for impact virtual environment". You can call yours whatever you want. Run this command in the terminal, in whatever directory you want to create your virtual environment. It may take a little while to run.
python3 -m venv efi_venv
Now in order to "activate" that Python virtual environment we use this command:
source efi_venv/bin/activate
If you did that right, you'll see (efi_venv) prepending your terminal lines. That means this particular environment of Python is active. If you run deactivate. It'll exit you out of here.
With this virtual environment activated, any Python-related task...such as running Python or installing libraries will affect this version of Python and not the big system-wide one.2
OK so we need to install just one library within this virtual environment, the FastAPI framework. This can be done with the following command:
pip install "fastapi[standard]"
Ok you should be good. If, from the terminal you run python, it'll bring up a Python shell. Inside there do : import fastapi. If nothing pukes back at you, you're golden. Exit Python with exit().
Now let's write a basic FastAPI application now:
Basic Application
Make a subdirectory efi_test. Inside this efi_test directory make a new file and call it efi_test.py. This will be your "main" FastAPI application for this assignment which would eventually contain a lot of code. For now it'll be short and sweet. Anything that interfaces with your application will just respond with "hey there!"
from fastapi import FastAPI

app = FastAPI()

@app.get("/")
async def root():
  return "hey there"
Now in order to test this file we're not going to just run it like a normal Python file. Instead, fastAPI comes with a local development server that we can use to see how our stuff is working. It will spin up a little local webserver for you and host the application on your computer. To do this in a terminal with the virtual environment activated, run:
fastapi dev efi_test.py
You should see a whole bunch of stuff fly by. These are basically logs of your server working and it should look something like this:
   FastAPI   Starting development server 🚀

             Searching for package file structure from directories with __init__.py files
             Importing from /Users/jodalyst/fast_test

    module   🐍 efi_test.py

      code   Importing the FastAPI app object from the module with the following code:

             from efi_test import app

       app   Using import string: efi_test:app

    server   Server started at http://127.0.0.1:8000
    server   Documentation at http://127.0.0.1:8000/docs

       tip   Running in development mode, for production use: fastapi run

             Logs:

      INFO   Will watch for changes in these directories: ['/Users/jodalyst/fast_test']
      INFO   Uvicorn running on http://127.0.0.1:8000 (Press CTRL+C to quit)
      INFO   Started reloader process [19007] using WatchFiles
      INFO   Started server process [19009]
      INFO   Waiting for application startup.
      INFO   Application startup complete.
Among the lines that fly by you'll see one saying:
server Server started at http://127.0.0.1:8000
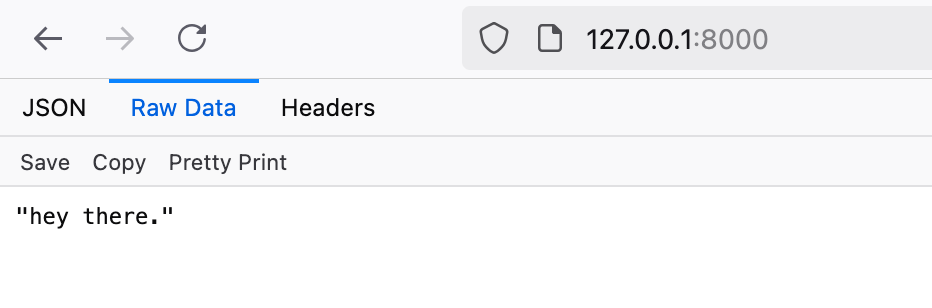
This is telling us that a development server is currently running at the IP address 127.0.0.1 and port 8000. We'll talk more about IP addresses and networking later in the term, but for now you can visit this address in a web browser, just like any other address. Go ahead. Open up a browser tab and type in 127.0.0.1:8000. You should get something like the following:
Note on most computers 127.0.0.1 is the internal address of the machine to itself and this usually has an aliased name localhost which you can also use directly:

Just to convince yourself of the causality in the situation we find ourselves in, go ahead and make a change to the text that your application is returning. Then restart (control-C to kill) the web server (though it usually does auto-restart on changes.). For example, I changed the text that came back from
@app.get("/")
def root():
  return "I am excited."
and now on refreshing the web page, I get:
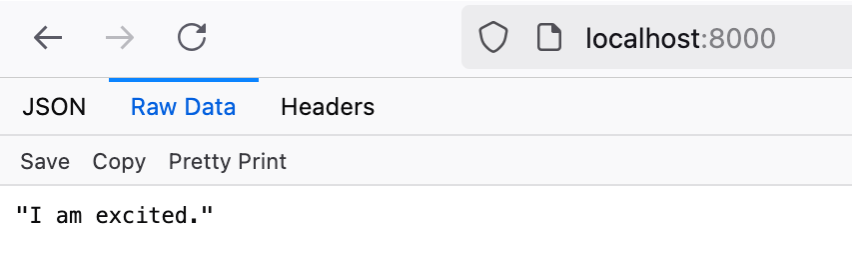
How about that.
Notice also in the shell that is running the Python development server, you should be getting readouts. These are logs of the server/application's behavior. For example, if I hit the page a few times with refreshes I get the following:
      INFO   Application startup complete.
      INFO   127.0.0.1:55188 - "GET / HTTP/1.1" 200
      INFO   127.0.0.1:55188 - "GET /favicon.ico HTTP/1.1" 404
      INFO   127.0.0.1:55196 - "GET / HTTP/1.1" 200
      INFO   127.0.0.1:55196 - "GET /favicon.ico HTTP/1.1" 404
      INFO   127.0.0.1:55197 - "GET / HTTP/1.1" 200
      INFO   127.0.0.1:55197 - "GET /favicon.ico HTTP/1.1" 404
      INFO   127.0.0.1:55200 - "GET / HTTP/1.1" 200
      INFO   127.0.0.1:55200 - "GET /favicon.ico HTTP/1.1" 404
      INFO   127.0.0.1:55201 - "GET / HTTP/1.1" 200
      INFO   127.0.0.1:55201 - "GET /favicon.ico HTTP/1.1" 404
      INFO   127.0.0.1:55202 - "GET / HTTP/1.1" 200
      INFO   127.0.0.1:55202 - "GET /favicon.ico HTTP/1.1" 404
The line with the GET / HTTP/1.1 (With the 200 code which means success in HTTP) is us hitting the page and getting a response, and the line about the 404 is the fact that we don't have a favicon.ico specified (code 404 means "not found" in HTTP). Note that you may not get the 404 error line.
Doing Useful Things
FastAPI is a full-fledged web framework. It is well-documented and widely used, so there's little reason for us to spend a bunch of time rewriting documentation...instead we should just go to the source: FastAPI Documentation and numerous other websites will go over effectively how to do things with it.
As a starter assignment which will take a little research on your part and studying the docs and experimenting let's write an application that can respond to incoming query arguments in our HTTP request. These are the things that show up after the ? in your URL. They generally show up as key-value pairs like http://internet.com?name=None&school=mit with individual pairs separated by ampersands.
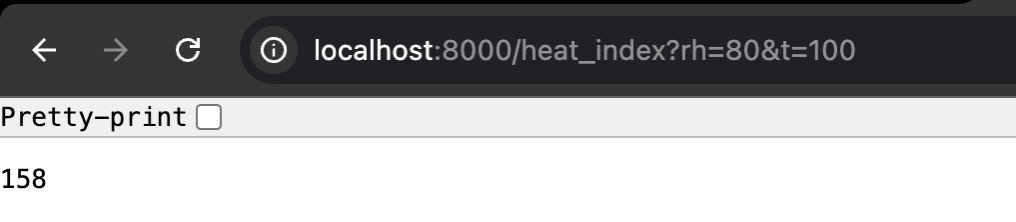
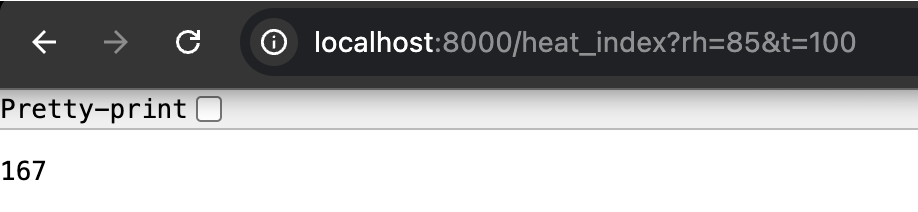
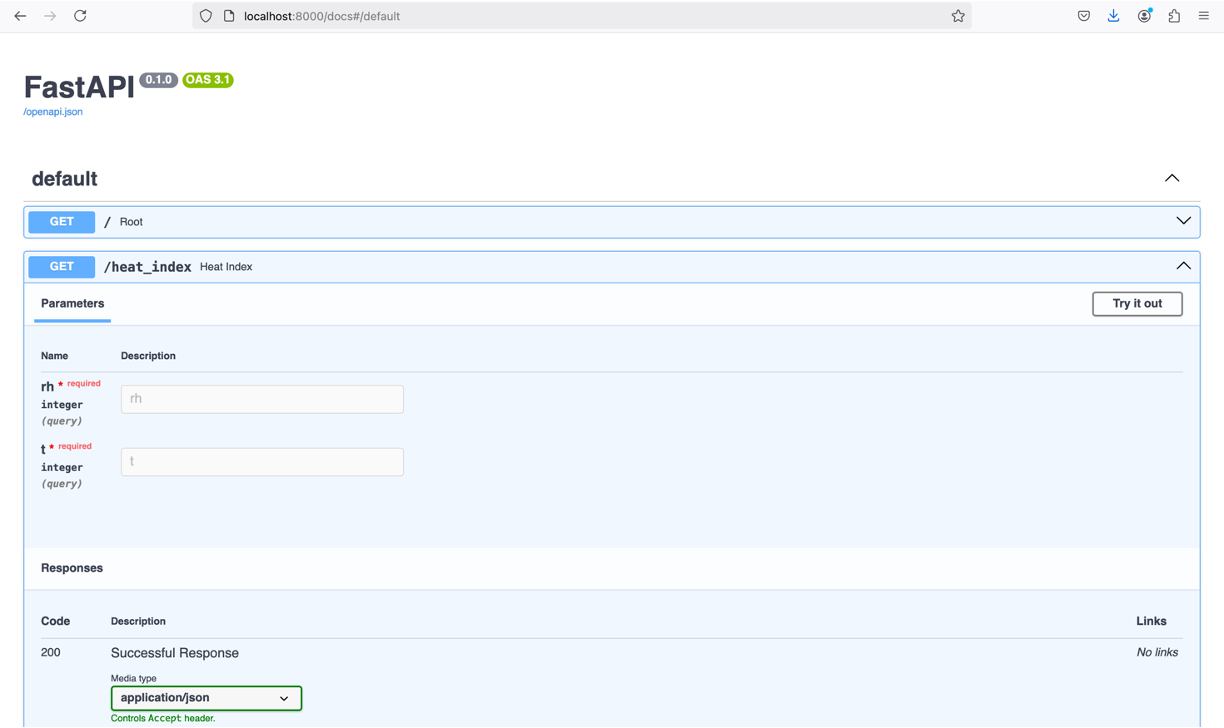
You can use them to provide inputs a web service and that's exactly how we'll do that here. Dig through the FastAPI documentation and find a way to have a sub-url called heat_index peform an operation where it looks for two incoming query arguments named rh and t that should be numbers (ints or floats) and return the corresponding heat index (the formula can be found here), rounded to the closest integer.
For example going to: localhost:8000/heat_index?rh=80&t=100 should yield 158 in the response. For other rh&t pairings, you can verify the appropriate heat index using this chart, but make sure t is at least 80 for the heat index to be valid.
Feel free to ask for help on Piazza and/or office hours! The solution to this should not be more than about ten lines of additional code (if that). you can end up doing this...it will be very useful and you understand a good portion of FastAPI then!
In the next section, we'll add a little bit more infrastructure so that you can "tunnel" your development application to a world-viewable endpoint.
Documentation
A really nice feature of FastAPI is it automatically generates documentation for the application that you're writing. If you go and visit localhost:8000/docs, you should get a page that looks something like below. This can be useful in debugging and just remembering what you wrote in the first place/allowing other people to understand what you wrote.
Footnotes
1In years past, we used the Flask framework, which really was a game-changer in the field as far Python-based web frameworks are concerned.
2Using virtual environments is a good idea in general. If you're ever at a job and they want you to mess with the Python, do a virtual environment first...you'll look cooler.