Lab 1
Please Log In for full access to the web site.
Note that this link will take you to an external site (https://shimmer.mit.edu) to authenticate, and then you will be redirected back to this page.
Product Teardown and Bill of Materials (BOM)
Learning Objectives
In developing a product, we need to understand how much it costs (which will inform how we price the product) As engineers, we also want to develop understanding for how a myriad of interconnected challenges are solved in creating a system: how do we fit everything in a constrained space, how to we apportion functionalities to different physical parts of a product (so-called physical partitioning). This will inform the design of our semester design project.
The systems we'll analyze in this class typically include a hardware component (with embedded software, called firmware), and a remote cloud or server component. The software and the cloud are hard to "take apart" and examine (and, as it turns out, cost out). But we can certainly examine hardware. This is called a teardown. Teardowns inform cost, but they also can serve a research and input for how we might implement certain fucntionalities. It's quite common to purchase and teardown a competitor's product to understand their design; it's also common to make your product hard to reverse engineer.
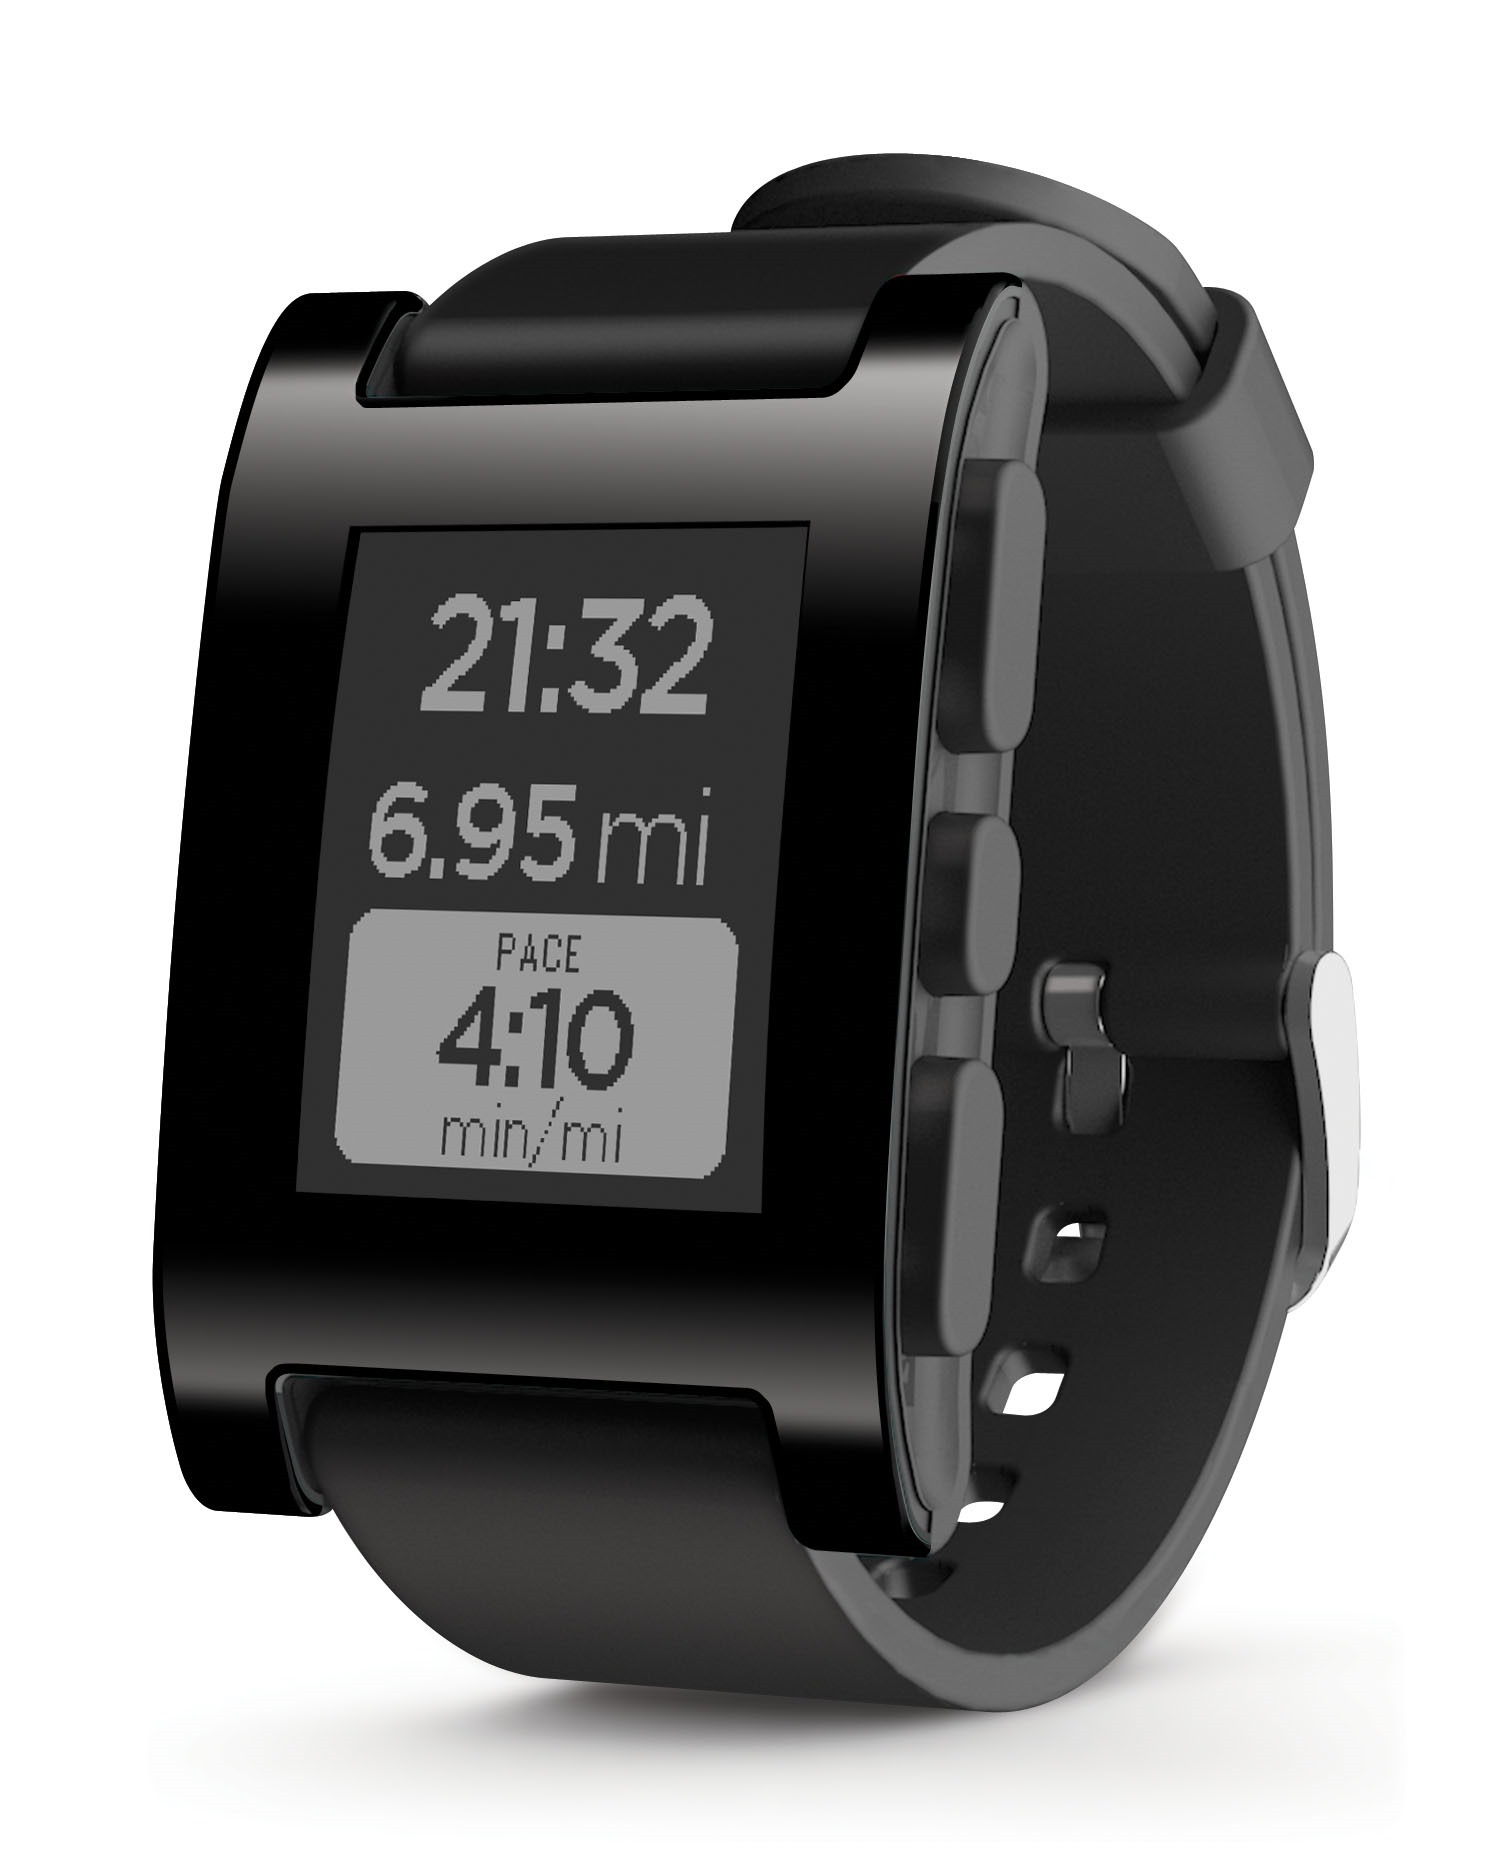
In this lab you will work in pairs to take apart a Pebble watch and catalog its components in order to gain insight about its constraints and design choices. Pebble is a Kickstarter-funded early Smartwatch first released in 2013 (you can read more about its history here).
Pebble and other wearable devices are examples of highly size-constrained systems and they manage to fit a lot of performance into a small form factor. While you are demolishing carefully disassembling your Pebble, take note of the clever ways components are assembled and connected. What do you expect and what surprises you about the way Pebble is constructed? What were likely the main constraints in the design of Pebble?
Preliminary Research
Go online and do some quick and dirty research on Pebble. Seek to familiarize yourself with this product: what is it and what can it do?
Here is a list of resources to get started, but this is by no means comprehensive!
Deliverable
As a pair, compile a list of functionalities that this Pebble watch provides and think about how these capabilities might be implemented in hardware. Based on your research, what kinds of components do you expect to find inside Pebble? Write this down somewhere (paper, laptop, whatever).
Discuss your predictions with a staff member

Teardown in Pairs
For the next part of the lab, split into pairs (one group of three may be necessary depending on the number of people in the class). You can decide amongst yourselves how to split up, and we'll be around to help as needed.
Stop by the entrance of EDS to pick up what you'll need for the teardown. Each pair should have:
- A Pebble watch
- A torx T5 screwdriver, spudger, and tweezers
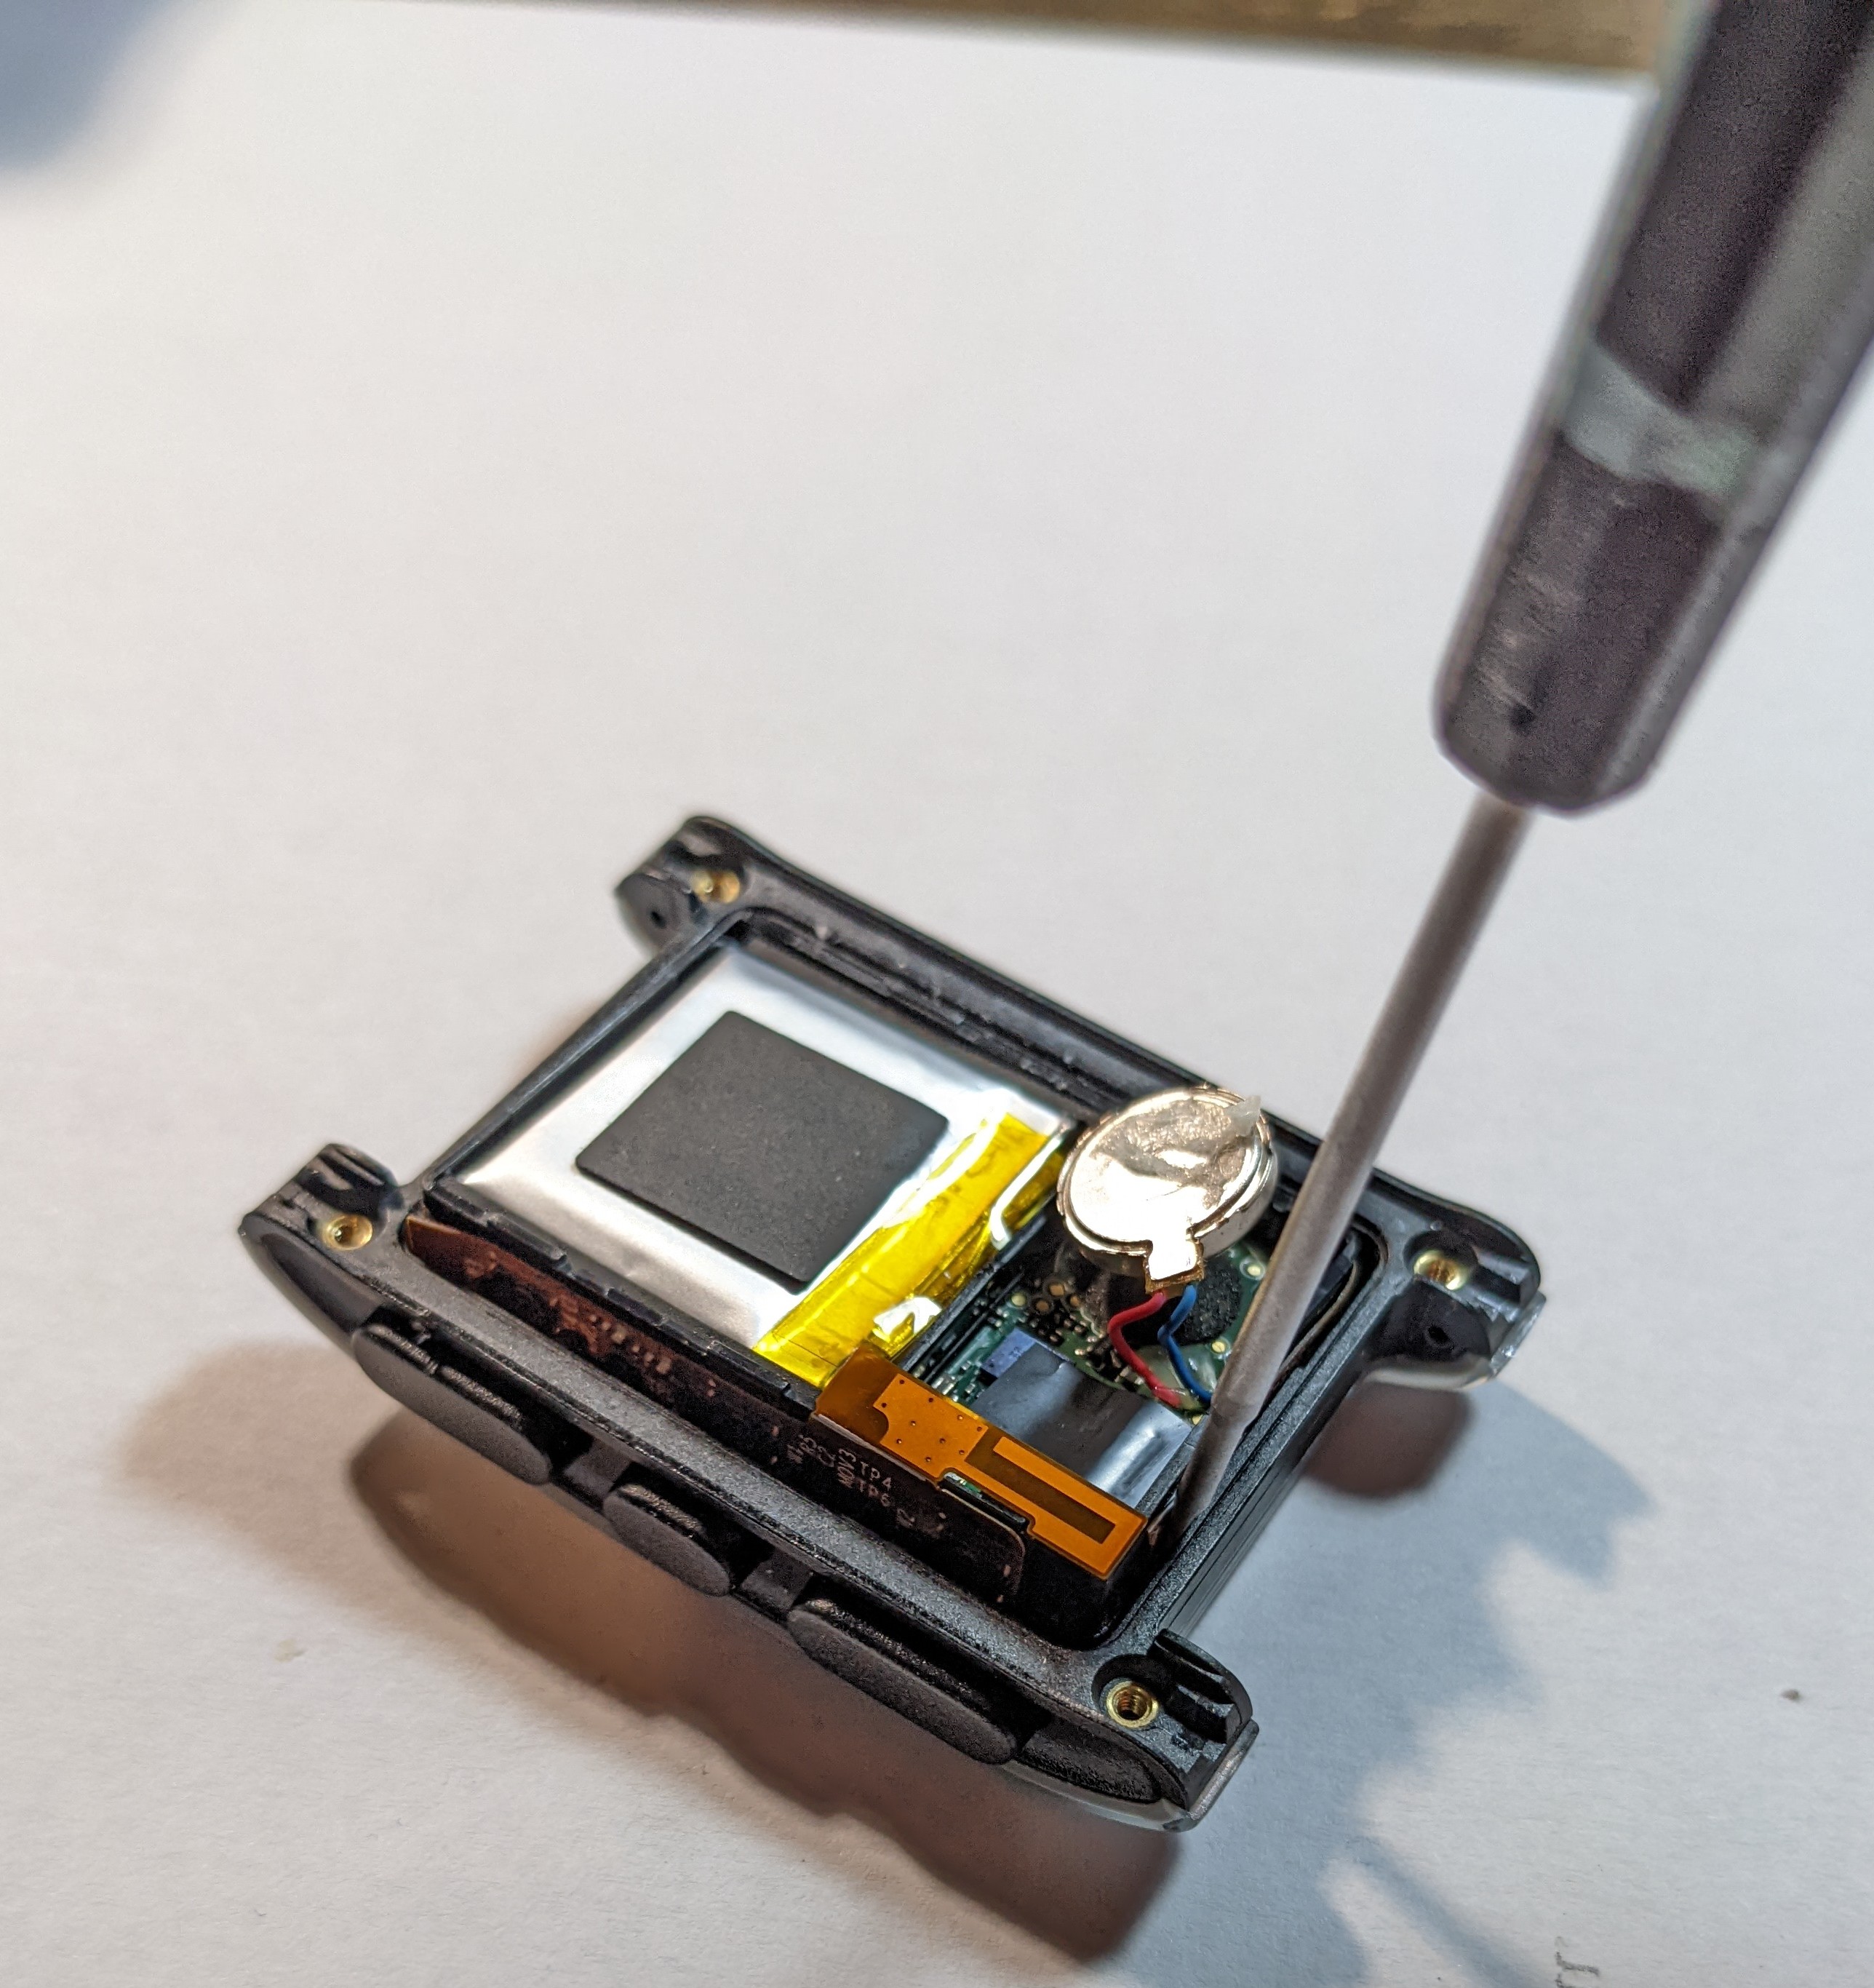
Carefully disassemble the Pebble. You should be able to keep all the components intact, but it isn't a big deal if some of the larger components (like the battery) become detached from the main circuit board. The spudger and tweezers will be useful here.
After you get the back panel off, removing the inner tray of components can be tricky. One way to remove it is to insert a spudger or small screwdriver between the tray and the outer shell and gently pry it out.
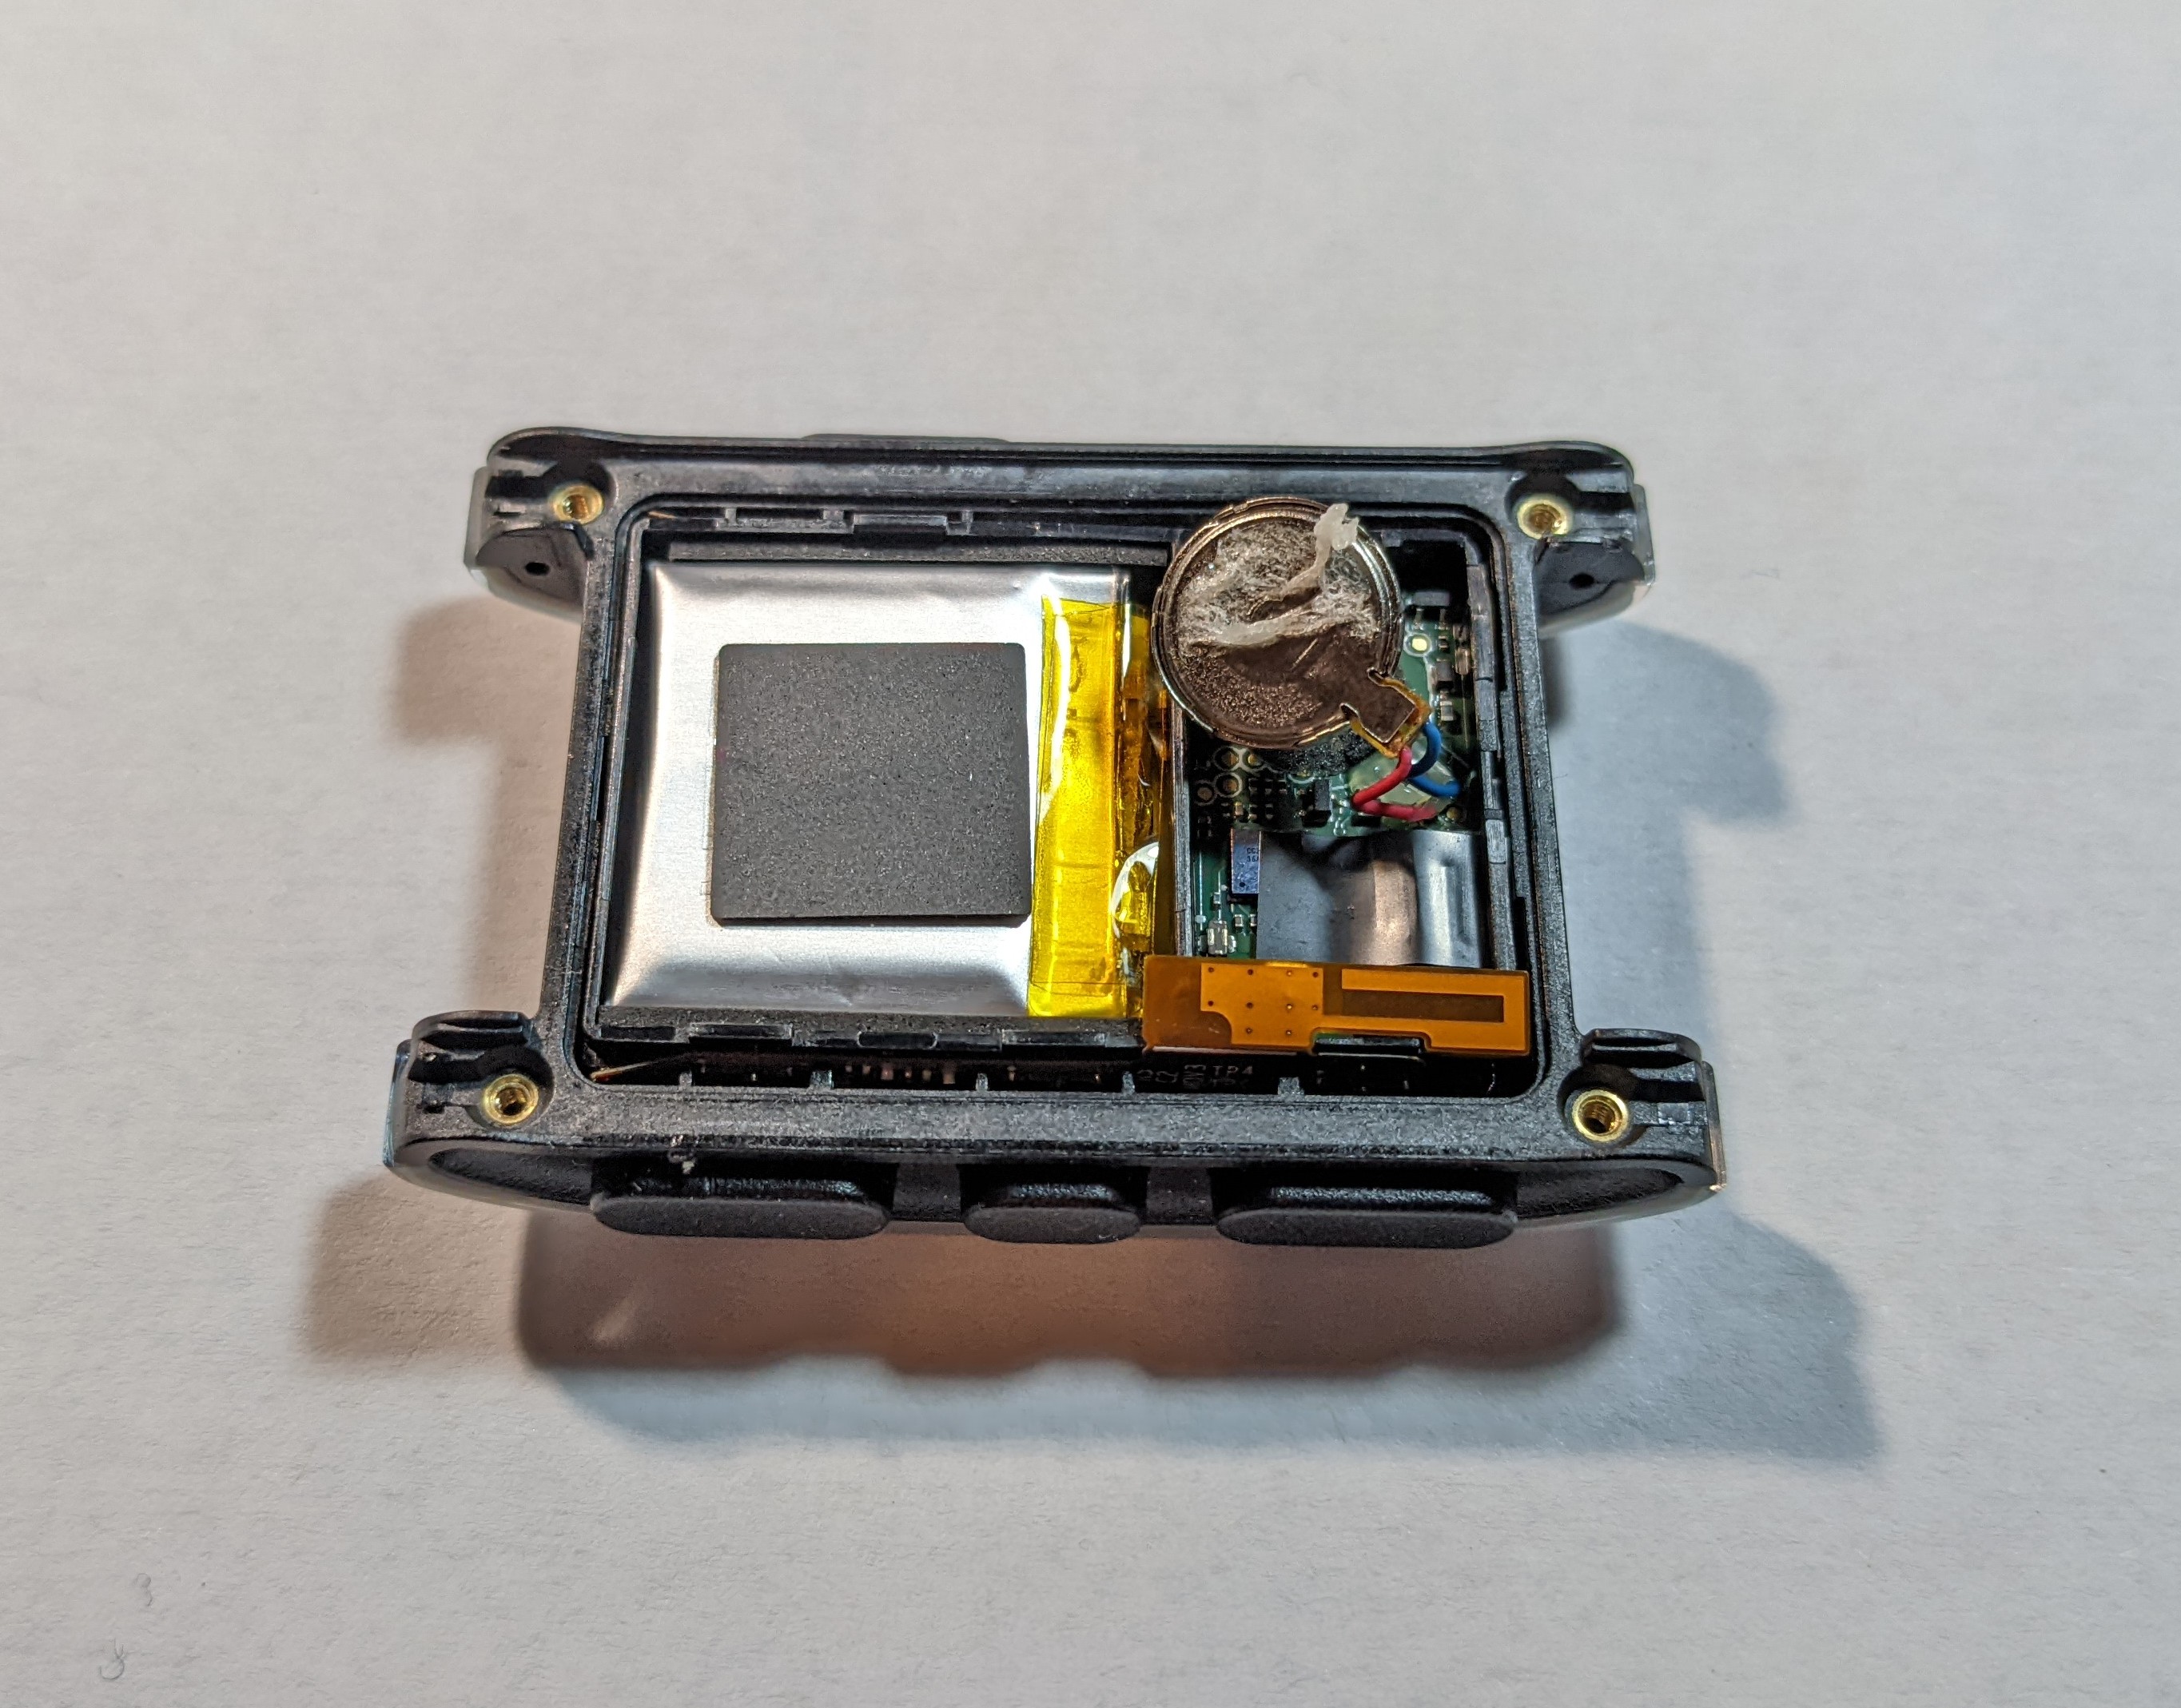
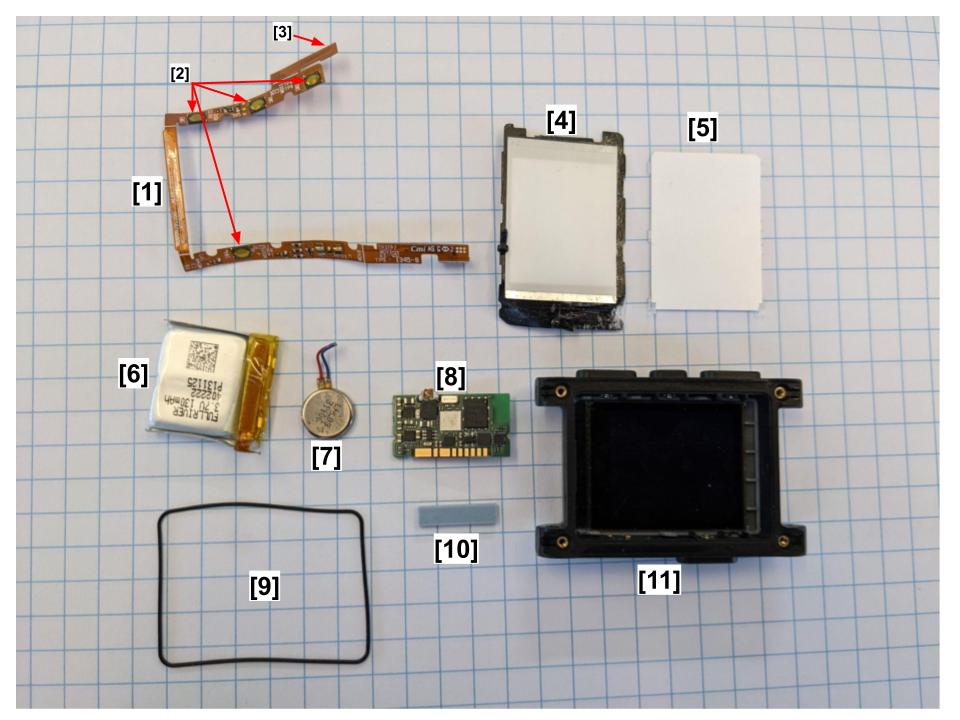
You should end up with the following components

Feel free to ask the staff if you get stuck or find something you don't expect.
Identifying Components
Next (still in pairs, teamwork makes the dream work), you will attempt to identify the components inside Pebble. The list of parts that comprise a product is called the bill of materials (BOM). The BOM can get quite extensive (it can include the mechanical parts, raw materials used in manufacturing, and so on), but here we'll focus on the electronics.
Starting in pset 1, we'll begin the electronics design for our air quality monitor MILO. The PCB design software we'll use will automatically create a BOM for us (yeah!). Here we'll get familiar with an electronics BOM and what goes in it.
To start, please duplicate this BOM template .
This simplified BOM template has a number of columns. Let's go into each one in detail:
Component description: what is the part? is it a resistor, a connector, a microcontroller, etc.?
Part number: what is the item number of the part. This is sometimes printed on the top of the part, and sometimes not! Part numbers may be a bit tricky to find on Google. Try searching for combinations of numbers on the package or leaving off suffixes like "RE6" (revision 6). Sometimes there are markings (numbers and/or letters) but they are not the actual part number, they are instead "marking codes". There are online databases of such codes, or you can sometimes google "marking code" + the code.
Link to datasheet: If you can find the part number, can you then find the datasheet? Sometimes datasheet are easy to find. Sometimes they are not (the part may be custom-made for a specific company, and thus no publicly accesible datasheet exists). Sometimes the datasheets are in English, sometimes Mandarin.
Footprint: Electronics components often have different shapes and sizes, called the footprint. Passive components like resistors, for example, come in thru-hole varieties (the ones that plug into breadboards) and surface mount (see comparison here. Surface mount can refer to the overall technology (SMT) or particular devices (SMD). We won't be too concerned with the difference here. The SMD resistors come in a wide range of sizes. The tiny ones make it easier to cram more parts into a given area, while the larger ones are easier to solder by hand. SMT integrated circuits also come in many packages. Sometimes these are hard to distinguish, but we'll do our best!
Quantity: Sometimes there is one instance of a component on a board. Sometimes there are 5 or 10 (such as for a resistor).
Cost: This is how much each part costs. You can only get this info if you can find the part number and then a supplier. It's good to start getting familiar with looking up parts. Two good sources are Digikey and Octopart. Octopart is an aggregator that shows prices across suppliers, while Digikey is a good name-brand distributor that we often use. If you look at the cost breakdown for a part, you'll notice that the price can vary dramatically depending on how many you buy. For example, here's the digikey page for the IMU we showed in lecture on Tuesday, the InvenSense ICM-20602. The price varies by >2x if you buy 1 vs. 1000. For the purposes of this class, we'll use prices at 1k order quantities. Of course, if you're Apple and you are buying 200M+ of a part, your price will be better...
As practice, try identifying this component (boxed in red). You should be able to find the product page. If you can't figure it out within 5-10 min, ask for help.

Now, start to identify components and fill in the BOM. For now, focus on the integrated circuits, and ignore the resistors and capacitors, other tiny two-terminal devices, connectors, and so on.
Deliverables
By the end of lab, we hope you'll have identified a handful of components. The rest will spill into pset 1, and will be done with your team. The deliverables are presented below, and more details are in the first pset. Your team will only need to create a single consolidatd version of each of the following deliverables.
Around 30 min prior to the end of the lab session, please ask for a checkoff and update the staff as to where you are.
Discuss the components you've found so far, and what roles you think they perform in the system.
All these deliverables should be placed in your team's Google Drive folder, which you'll create next week. So for now just keep this info someplace safe!
1.) Bill of Materials
Submit a single Bill of Materials spreadsheet cataloging the components your team has found inside Pebble.
Here we encourage you to try to identify connectors (even if you can't find part numbers or costs), battery, parts on the flexible printed circuit board (this is the "U"-shaped yellow-ish board), display, and so on. It would even be great to count up the number of resistors and capacitors and put them in your BOM. You can assume each resistor costs $0.0025, and each capacitor is $0.003, which are reasonable prices.
Sometimes you can find the part, but it is obsolete, and no longer produced or stocked, and thus you can't find a price.
Next, you will create a google doc with 3 sections.
2.) Hardware Annotation
The first section will be the hardware annotation. As part of the annotation, put in a sentence about what you think the part does.
Here is an example of one way you might annotate your Pebble hardware:
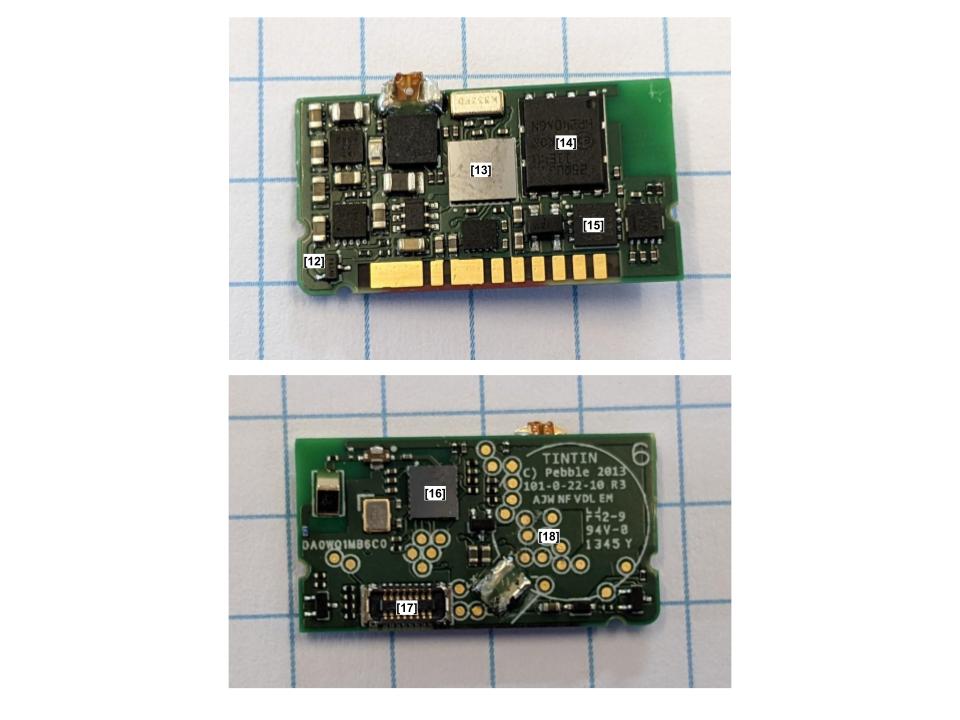
[1] [Description/part number]
[2] [Description/part number]
[3] [Description/part number]
...
3.) Components, functions and system diagram
The second section of the google doc will contain a mapping (text, diagrams, you choose) between the list of functionalities created at the start of lab and the components you identified. For example, if you decided that the watch should be able to display information (a function), what component(s) create that function? Try your best to map the components onto the functionalities.
The third and final section of the google doc will contain the system diagram. Given your component and function mapping, create a functional system diagram (this will be a drawing or figure).
4.) Software?
Thus far we've only discussed on the Pebble's hardware, but it's more than just the chips inside. There's a lot of software that runs on the smartwatch itself - in this case, it's running some custom firmware likely written in C. This is pretty common for smaller embedded systems - C (and C++) has been the norm for a while now, but Rust is becoming more popular for this kind of thing. For more complicated embedded systems, we might run an OS, scaled down to fit onto the hardware of course. This is what Google and Apple do with their smartwatches. Google's got Wear OS, and Apple has watchOS. Very creative naming.
Back in the day, the Pebble would connect to an app on your phone, and communicate with the outside world through that. The language these are written in depends on your platform - Android apps are primarily written in Kotlin and Java, and iOS apps use Swift and Objective C. There are no cloud servers for the Pebble; instead, it uses apps on your phone as gateway to the outside world. By now, you should have figured out how the watch communicates with the phone.
Bonus
In addition to a sense of pride and fullfillment, the team with the most complete and accurate final deliverables will win a prize!